


Table of contents
Resource Management:
Terraform stores information about your infrastructure in a state file. This state file keeps track of resources created by your configuration and maps them to real-world resources.
Terraform compares your configuration with the state file and your existing infrastructure to create plans and make changes to your infrastructure. When you run terraform apply or terraform destroy against your initialized configuration, Terraform writes metadata about your configuration to the state file and updates your infrastructure resources accordingly.
In Terraform, resources are the most important part of Terraform. Resources are defined by resource blocks. A resource can define one or more infrastructure resource objects, such as VPCs, virtual machines, or DNS records, Consul key-value pair data, etc.
Resource Syntax
Resources are defined through resource blocks, and I will first explain the scenario of defining a single resource object through resource blocks.
resource "aws_instance" "web_server" {
  ami           = "ami-a1b2c3d4"
  instance_type = "t2.micro"
}
In the above example, following the resource keyword is the resource type, which in the above example is aws_instance. The following is the Local Name of the resource, which is in the example web_server.
The Local Name can be used to reference the resource in the code in the same module, but the combination of type and Local Name must be unique in the current module, and the Local Name of two resources of different types can be the same.
The content in the curly braces is the block, and the values of the various parameters used to create the resource are defined in the block. In the example we define the image id used by the EC2 server and its size.
Resource Behavior
A resource block declares an exact infrastructure object that the author wants to create, and sets the values of various properties. If we are writing a new Terraform code file, the resources defined by the code only exist in the code, and no corresponding actual infrastructure resources exist.
Performing terraform apply on a set of Terraform code creates, updates, or destroys actual infrastructure objects, and Terraform develops and executes a change plan so that the actual infrastructure conforms to the code’s definition.
Whenever Terraform creates a new infrastructure object according to a resource block, the id of the actual object is stored in Terraform state so that Terraform can update or destroy it in the future according to the change plan.
If the resource described by a resource block is already recorded in the state file, then Terraform will compare the state of the record with the state described by the code, and if necessary, Terraform will make a change plan to make the state of the resource match the description of the code.
This behavior applies to all resources regardless of their type. The details of creating, updating, and destroying a resource vary by resource type, but the rules of behavior are general.
Terraform logs information about the resources it has created in a state file. This enables Terraform to know which resources are under its control and when to update and destroy them. The terraform state file, by default, is named terraform.tfstate and is held in the same directory where Terraform is run. It is created after running terraform apply.
The actual content of this file is a JSON formatted mapping of the resources defined in the configuration and those that exist in your infrastructure. When Terraform is run, it can then use this mapping to compare infrastructure to the code and make any adjustments as necessary.
Build Your Own AWS Infrastructure with Ease using Infrastructure as Code (IaC):
Cofiguration file to set up the AWS Infrastructure:
#provider.tf

ubuntu@ip-172-31-89-245:~/day66b$ cat provider.tf
# Configure the AWS Provider
provider "aws" {
  region = "us-east-1"
}

ec2.tf
#securitygroup
resource "aws_security_group" "web_server" {
  name        = "web-server-sg"
  description = "Allow SSH and HTTP access from anywhere"
  vpc_id = aws_vpc.main.id
  ingress {
    from_port   = 22
    to_port     = 22
    protocol    = "tcp"
    cidr_blocks = ["0.0.0.0/0"]
  }

  ingress {
    from_port   = 80
    to_port     = 80
    protocol    = "tcp"
    cidr_blocks = ["0.0.0.0/0"]
  }

  egress {
    from_port   = 0
    to_port     = 0
    protocol    = "-1"
    cidr_blocks = ["0.0.0.0/0"]
  }

}

resource "aws_instance" "example" {
  ami           = "ami-053b0d53c279acc90"
  instance_type = "t2.micro"
  key_name      = "my_newkey"
  subnet_id     = aws_subnet.public.id
  associate_public_ip_address = true
  security_groups = [
    aws_security_group.web_server.id
  ]

  user_data = filebase64("userdata.sh")

  tags = {
    Name = "web-server"
  }
}
#subnet.tf
resource "aws_subnet" "private" {
  vpc_id            = aws_vpc.main.id
  cidr_block        = "10.0.32.0/20"
  availability_zone = "us-east-1a"

  tags = {
    Name = "private"
  }
}

resource "aws_subnet" "public" {
  vpc_id            = aws_vpc.main.id
  cidr_block        = "10.0.16.0/20"
  availability_zone = "us-east-1a"

  tags = {
    Name = "public"
  }
}

#route.tf

resource "aws_route_table" "public" {
  vpc_id = aws_vpc.main.id

  route {
    cidr_block = "0.0.0.0/0"
    gateway_id = aws_internet_gateway.gw.id
  }

  tags = {
    Name = "public"
  }
}

resource "aws_route_table_association" "public_subnet_association" {
  subnet_id      = aws_subnet.public.id
  route_table_id = aws_route_table.public.id
}

#vpc.tf

resource "aws_vpc" "main" {
  cidr_block = "10.0.0.0/16"

  tags = {
    Name = "main"
  }
}

#IGW.tf
resource "aws_internet_gateway" "gw" {
  vpc_id = aws_vpc.main.id

  tags = {
    Name = "internet-gateway"
  }
}
#terraform.tf
terraform {
  required_providers {
    aws = {
      source  = "hashicorp/aws"
      version = "~> 4.0"
    }
  }
}

#userdata.sh---script to deploy the server
Run
terraform initThe
terraform plancommand creates an execution plan, which lets you preview the changes that Terraform plans to make to your infrastructure. By default, when Terraform creates a plan it:Reads the current state of any already-existing remote objects to make sure that the Terraform state is up-to-date.
Compares the current configuration to the prior state and noting any differences.
Proposes a set of change actions that should, if applied, make the remote objects match the configuration.
Run
terraform applyto apply the configuration and typeyeswhen prompted.Wait for the EC2 instance
ec2_newto be created.Terraform State Manipulation
terraform state show aws_instance.my_ec2#show details stored in Terraform state for the resourceterraform state pull > terraform.tfstate#download and output terraform state to a fileterraform state mv aws_iam_role.my_ssm_role module.custom_module#move a resource tracked via state to different moduleterraform state replace-provider hashicorp/awsregistry.custom.com/aws#replace an existing provider with anotherterraform state list#list out all the resources tracked via the current state fileterraform state rm aws_instance.myinstace#unmanage a resource, delete it from Terraform state file
Terraform Import And Outputs
terraform import aws_instance.new_ec2_instance i-abcd1234#import EC2 instance with id i-abcd1234 into the Terraform resource named “new_ec2_instance” of type “aws_instance”terraform import 'aws_instance.new_ec2_instance[0]' i-abcd1234#same as above, imports a real-world resource into an instance of Terraform resourceterraform output#list all outputs as stated in codeterraform output instance_public_ip# list out a specific declared outputterraform output -json#list all outputs in JSON format
Configurations by using Google cloud engine:
provider "google" {

  project = var.project_id
  region  = var.region
}

resource "google_compute_address" "ip_address" {
  name = "external-ip"
}

locals {
  access_config = {
    nat_ip       = google_compute_address.ip_address.address
    network_tier = "PREMIUM"
  }
}

module "instance_template" {
  source                       = "../../../modules/instance_template"
  project_id                   = var.project_id
  subnetwork                   = var.subnetwork
  stack_type                   = "IPV4_ONLY"
  service_account              = var.service_account
  name_prefix                  = "simple"
  tags                         = var.tags
  labels                       = var.labels
  access_config                = [local.access_config]
  enable_nested_virtualization = var.enable_nested_virtualization
  threads_per_core             = var.threads_per_core
}
output "self_link" {
  description = "Self-link to the instance template"
  value       = module.instance_template.self_link
}

output "name" {
  description = "Name of the instance templates"
  value       = module.instance_template.name
}
Simple instance template:
This is a simple, minimal example of how to use the instance_template module.
Inputs
| Name | Description | Type | Default | Required | | --- | --- | --- | --- | --- | | enable_nested_virtualization | Defines whether the instance should have nested virtualization enabled. |
bool|false| no | | labels | Labels, provided as a map |map(string)| n/a | yes | | project_id | The GCP project to use for integration tests |string| n/a | yes | | region | The GCP region to create and test resources in |string|"us-central1"| no | | service_account | Service account to attach to the instance. See https://www.terraform.io/docs/providers/google/r/compute_instance_template#service_account. | object({ | | | | email = string | | | | | | scopes = set(string) | | | | | | }) |null| no | | | | subnetwork | The name of the subnetwork create this instance in. |string|""| no | | tags | Network tags, provided as a list |list(string)| n/a | yes | | threads_per_core | The number of threads per physical core. To disable simultaneous multithreading (SMT) set this to 1. |string|null| no |Outputs
| Name | Description | | --- | --- | | name | Name of the instance templates | | self_link | Self-link to the instance template |
Resource dependencies:
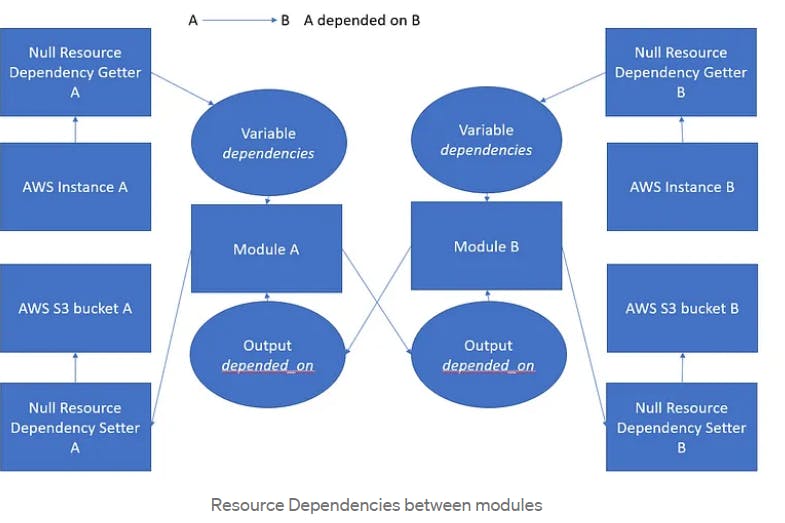
There are some things you should consider when using Terraform depends_on:
Always include a comment to explain why using
depends_onis necessary.depends_oncauses Terraform to create a more conservative plan. The plan may modify more resources than necessary. For example, there may be more values as unknown “(known after apply).” This is more likely to occur when creating explicit dependencies between modules.Adding explicit dependencies can increase the length of time it takes to build your infrastructure. Terraform must wait until the dependency object is created before continuing.
It is recommended to use expression references to create implicit dependencies whenever possible.
Implicit dependencies are the primary way that Terraform understands the relationships between your resources. Sometimes there are dependencies between resources that are not visible to Terraform, however. The depends_on argument is accepted by any resource or module block and accepts a list of resources to create explicit dependencies for.
e.g. assume you have an application running on your EC2 instance that expects to use a specific Amazon S3 bucket. This dependency is configured inside the application, and thus not visible to Terraform. You can use depends_on to explicitly declare the dependency. You can also specify multiple resources in the depends_on argument, and Terraform will wait until all of them have been created before creating the target resource.
Tip
Since Terraform will wait to create the dependent resource until after the specified resource is created, adding explicit dependencies can increase the length of time it takes for Terraform to create your infrastructure.
Add the following to main.tf.
Tip:This configuration includes a reference to a new module, terraform-aws-modules/sqs/aws. Modules must be installed before Terraform can use them.
resource "aws_s3_bucket" "example" { }

resource "aws_instance" "example_c" {
  ami           = data.aws_ami.amazon_linux.id
  instance_type = "t2.micro"

  depends_on = [aws_s3_bucket.example]
}

module "example_sqs_queue" {
  source  = "terraform-aws-modules/sqs/aws"
  version = "3.3.0"

  depends_on = [aws_s3_bucket.example, aws_instance.example_c]
}
Terraform Provisioners:
Terraform Provisioners are used for executing scripts or shell commands on a local or remote machine as part of resource creation/deletion. They are similar to “EC2 instance user data” scripts that only run once on the creation and if it fails terraform marks it tainted.
How to use provisioners:
If you are certain that provisioners are the best way to solve your problem, you can add a provisioner block inside the resource block of a compute instance.
resource "aws_instance" "web" {
  # ...

  provisioner "local-exec" {
    command = "echo The server's IP address is ${self.private_ip}"
  }
}
The local-exec provisioner requires no other configuration, but most other provisioners must connect to the remote system using SSH or WinRM. You must include a connection block so that Terraform will know how to communicate with the server.
local-exec provisioner helps run a script on instance where we are running our terraform code, not on the resource we are creating. For example, if we want to write EC2 instance IP address to a file, then we can use below local-exec provisioner with our EC2 resource and save it locally in a file.
resource "aws_instance" "testInstance" {
  ami           = "${var.instance_ami}"
  instance_type = "${var.instance_type}"
  subnet_id = "${aws_subnet.subnet_public.id}"
  vpc_security_group_ids = ["${aws_security_group.sg_22.id}"]
  key_name = "${aws_key_pair.ec2key.key_name}"tags {
        "Environment" = "${var.environment_tag}"
  }
  provisioner "local-exec" {
    command = "echo ${aws_instance.testInstance.public_ip} >> public_ip.txt"
  }
}
remote-exec provisioner helps invoke a script on the remote resource once it is created. We can provide a list of command strings which are executed in the order they are provided. We can also provide scripts with a local path which is copied remotely and then executed on the remote resource. file provisioner is used to copy files or directories to a remote resource. We can’t provide any arguments to script in remote-exec provisioner. We can achieve this by copying script from file provisioner and then execute a script using a list of commands.
Provisioner which execute commands on a resource (like running a script or copying file)needs to connect to the resource which can be done through SSH. We can define connection method per resource or per provisioner if we want them to connect using different SSH parameters.
There is a special resource named “null_resource” which allow us to configure provisioners which are not directly associated with any resource. It behaves like any other resource which needs connection and provisioner details. For this resource, we need to define triggers which used to trigger a rerun for its set of provisioners.
Lifecycle Management in Terraform:
What can we control?
Terraform gives us the following options that we can use in the lifecycle meta-argument:
create_before_destroy— when an in-place update has to occur Terraform will create the new instance prior to destroying the oldprevent_destroy— do not allow the destroy flow to actually destruct the resourceignore_changes— ignore any changes on specified fields or an entire objectreplace_triggered_byprecondition— check some thing before performing the action on the resourcepostcondition— validate some thing after performing an action on the resource
We will go through most of these in a little more detail, although for the *condition you can check out this post.
Create Before Destroy
The create_before_destroy option is extremely useful in cases where the new instance of the resource must be there before destroy the old one. For example perhaps a public IP needs to be recreated but you don’t want the service to be inaccessible so you would ensure that the new address is created prior to the old one being destroyed.
Using the Scratch provider we can mock out an example of this:
resource "scratch_string" "this" {
  in = "create_before_destroy"

  lifecycle {
    create_before_destroy = true
  }
}
The above will now ensure that in the event this resource is required to be replaced in- place that it will create the new instance first.
Prevent Destroy
prevent_destroy is another bool option which we can switch on, we would use this to ensure that Terraform never destroys the particular resource. On destroy the resource would be removed from state but still exist in the real world. This is useful in scenarios where perhaps not all your resources are managed by Terraform, or you do not want anyone to accidentally delete a particular resource.
Let’s dive into an example to better understand this concept.
resource "azurerm_resource_group" "this" {
  name     = "rg-prod"
  location = "australiasoutheast"

  lifecycle {
    prevent_destroy = true
  }
}
In the above we are creating a resource group, and we have informed Terraform we want to prevent its destruction through the lifecycle meta-argument. In this scenario let’s assume that we are only managing a portion of the resources within the resource group (RG) via Terraform and other via some other mechanism. If we were to not have prevent_destroy when we eventually did a destruction those resources created out of Terraform would also be destroyed. By having prevent_destroy we are now required to be more assertive when we want to destroy the RG, we would either have to remove it manually or commit a change removing the lifecycle attribute.
I find that prevent_destroy is a favourite to security folks as it helps to add an extra level of assurance around destructive operations, especially on resource types that have such a large blast area like a resource group.
Ignore Changes
Now we come to one of the more commonly used and in my opinion the most dangerous, ignore_changes. A reason why you might want to use ignore_changes is if some outside force / process is going to be modifying your resources, an example of this might be mutation of tags or tag values via Azure policy or potentially the number of instances of a resource due to a scaling event. Both of those examples are what I would consider good reasons to utilise ignore_changes. Lets look at a very basic example:
resource "scratch_block" "this" {
  in {
    string = "Meow"
    number = 42
    bool = true
  }

  lifecycle {
    ignore_changes = [
      in
    ]
  }
}
In the above scratch_block we are ignoring any changes to the in block, and we cannot ignore a specific property on that block as the block is actually represented as a set which does not have an index or referenceable value. It is important to note that the values provided here must be static, you cannot pass in a variable or a splat. The only exception is the use of the special all keyword in place of a list which will then ignore all attributes on the resource.
ignore_changes becomes dangerous when you start ignoring entire resources as then changes you make to the code won’t alter the resource this means you’re only managing two stages of the resource Apply and Destroy all alteration would then have to be managed by an external system.
Many organisations uses tags for managing or attributing cost with cloud resources so ignore changing to particular tags or the tags property can be very valuable as it allows an external system to manage the tags on resources for you without Terraform overwriting the changes. When using ignore_changes my advice to be as specific about the property you’re wanting to ignore as you possibly can be!
Replace Triggered By
replace_triggered_by is a very new addition to language, only coming out with Terraform v1.2, it is also a very powerful argument. This will replace a particular resource based on another resource. Below is an example:
resource "scratch_bool" "this" {
  in = false
}

resource "scratch_string" "this" {
  in = "create_before_destroy"

  lifecycle {
    replace_triggered_by = [
      scratch_bool.this
    ]
  }
}
In the above example we have two resources scratch_bool.this and scratch_string.this we are tying a replace to the scratch_boo.this. What this means is that if we were to update scratch_bool.this.in to be true the entire scratch_string.this resource would be replaced!
This allows us to create really tight dependancies on resources that may not be otherwise related in our Terraform code. You should however be very careful using this as if the referenced resource changes then your resource will be replaced.
linkdin:https://www.linkedin.com/in/gajanan-barure-7351a4140
Happy Learning :)
Thank you for reading!! Hope you find this helpful.
Terraweekday03#challenge